A well-functioning irrigation system is one of the most important aspects of a garden. When you have a well-designed irrigation system, your plants will be able to receive enough water and nutrients to thrive. However, if your sprinkler lines burst or leak, they can do more than just ruin your plants’ growth—they can also cause serious damage to your house.
If you want to avoid having to repair damage caused by an irrigation line bursting or leaking, consider installing an irrigation cap. The purpose of this fixture is not only to prevent leaks but also to prevent any potential damage that may happen should a leak occur in the first place.
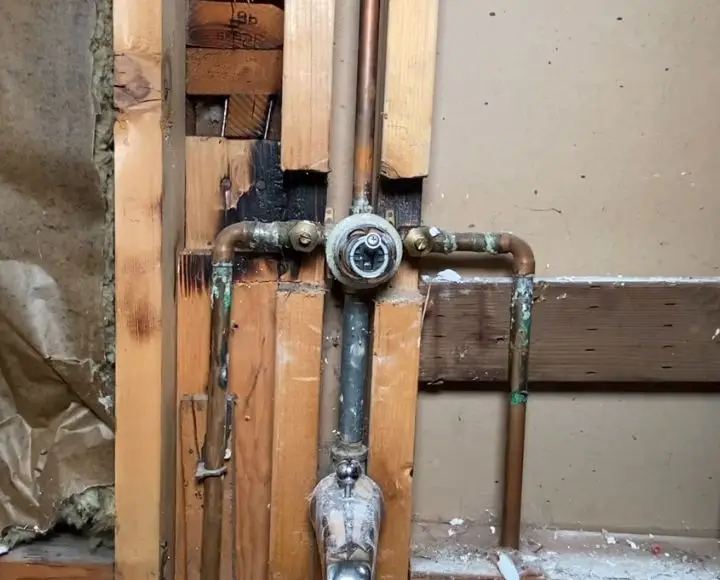
Here then, is how to cap a water line under pressure.
Check the Water Pipe for Cracks
When you’re working on a water line under pressure, it’s best to start by checking for cracks in the pipe. If there are any, you’ve got a problem. To do this, simply use your eyes. You can easily tell where a crack is by locating where the water is leaking from.
Switch Off the Supply Line
Before you start capping a water line under pressure, turn off the supply line. This will prevent any unwanted pressure from building up in the system and causing damage to plumbing components. If you don’t do this first, then there is a danger of bursting pipes because of over-pressurization or even a burst water pipe.
Cut the Supply Pipe
This is a very important step, as you don’t want to short out your water supply. If you’re doing this for yourself, you’ll need a utility knife or other sharp, heavy-duty cutting tool; if you’re doing it for a company, you’ll probably be able to use their equipment.
After doing this, you will have two ends of the line that you want to clean up.
Cap the Line
After you’ve created the space, you’ll need to cap the line. This is usually a metal or plastic stopper that’s placed on top of the pipe. It works by preventing water from leaking out of the pipe. You’ll have to make sure that the cap is properly tightened and that there are no gaps between it and the rest of your plumbing system.
Test Your Water System
Once you have installed this pressure cap over your water line, it’s time to test whether or not everything works properly or not. In order to do so, turn on the supply line to let some water flow into the water line until you see that there are no leaks anywhere.
Tips for Capping Water Lines under Pressure
If you have a water line under pressure, it’s important to cap it. This can prevent water from leaking and causing damage to your home. Here are five tips for capping a garden water line under pressure:
- Prepare for work by cleaning out any debris that may have gotten into the pipe. Use a snake or other tool to place in the pipe and clear out any dirt or debris that has accumulated over time.
- Consider using a pressure washer to remove any rust or corrosion from your pipe before using chemicals or anything else to seal up the line itself. This will help prevent leaks later down the road when you might not have time to clean everything out again.
- Be prepared for multiple leaks. Sometimes, there are multiple leaks in an area that needs to be fixed at once instead of one at a time. Make sure you have all the tools you’ll need before fixing anything else so that you can get back to work quickly if necessary.
- Pay attention to where the leak is coming from and how much water is escaping from it. For example, if you have several leaks coming from a faucet or sprinkler head in a single area, then there may be another problem somewhere else in that same area as well as elsewhere on your property or within close proximity of where those leaks are coming from. In other words, they could be coming directly out of your main sewer line.
- Have all the tools you need at hand. It is crucial to assess your situation and ensure that everything you need to complete the job is within reach. If not, you’ll spend time looking for supplies in stores or online, which could lead to a delay in the project. You’ll also need to be prepared for any potential damage that may occur during installation.
- Read through the instructions before starting work. Before starting work on your garden water line under pressure, it is important to read through all of the instructions that come with your replacement cap carefully and follow them exactly as they are written. This will help ensure that nothing goes wrong during the installation or while working on this project in general.
How Do I Cap my PVC Water Line?
To cap a PVC water line under pressure, you should use PVC cement. PVC cement is an adhesive that seals the pipe and helps to prevent leaks.
PVC cement has different types of formulas depending on what you are using it for. You may need to get a professional plumber to apply it if you do not have any experience with plumbing or if you have never used this type of product before.
How Do I Cap Off PVC Pipes?
You can use PVC cement to cap off PVC pipes. However, it is important that you follow the manufacturer’s instructions. The type of cement you use can vary depending on its contents and how it was mixed.
After that, you will use a wrench to twist the PVC cap so that it sits correctly.
How Do I Permanently Cap Off Water Pipes?
You will need to use primer and cement capping. Primer is used to fill the hole in the pipe before applying the cement. The primer must be able to withstand the high pressure of the flowing water. Once this is accomplished, you can apply the cement in order to permanently seal off your water supply line.